Carbon Microphone Replacement To Magnetic Mike Converter Circuit
A good magnetic mic is more better then a carbon mic and easy to find nowadays. so we can you this mic circuit to above conversion.
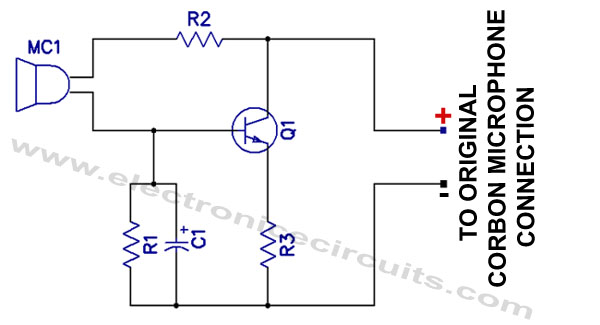
Good pitching beats good hitting and a good magnetic mic beats a good carbon mic. This one transistor carbon mic converter takes a carbon mic input and converts it to the magnetic variety. Note that no ground connection is used, even if the circuit is built in a metal cabinet. MIC is replacement type magnetic element that is substituted for the original carbon element.

| PARTS LIST | |
| R1 | 2.2kΩ |
| R2 | 6.8kΩ |
| R3 | 240Ω |
| C1 | 10µF |
| Q1 | 2N3394 |
| MIC | Microphone magnetic replacement element |
This mic circuit Uses miniature components the entire converter amplifier can also be housed in the original microphone case. To avoid destruction of Q1, the unit must be connected properly the first time. The “+” lead, which goes to Q1’s collector, connects to the carbon mic input that supplies a positive voltage.
Please send your ideas, which are very important for our success…
Genial post and this enter helped me alot in my college assignement. Thanks you for your information.
I can’t believe this would work, with the base bypassed to common like that. And R2 would greatly attenuate the output of the dynamic mike. Try this: Use a PNP, collector to negative, base to negative through R1, put mike between C1 negative and collector. Add a low resistance in the emitter leg to + to adjust the gain and stabilize the bias. (Select R1 for best current range.) With the same hookup, you can use an NPN if you reverse the voltage, since this is just a current modulator.
It took me a long time to search on the web, only your site unfold the fully details, bookmarked and thanks again.
– Kris
I was questioning the circuit as was Stan. I was thinking, why not move the top of C1 to the junction of MC1 and R2. That would seem to take care of both problems.
I posted my thoughts on what Stan said but they seem to have vanished. I suggested moving the + side of C1 to the junction of R2 and MC1. That seems to make more sense, design-wise.